User Guide · App version 1.0
Download Android app (APK)Measuring borehole water levels with Aquatara.
This guide explains how to set up the Aquatara device and Android app, calibrate a borehole, take a water level measurement and share the results. It is written for engineers who plan and review monitoring work and for operators who take measurements in the field. Sections 2–6 follow the order of a typical first day with the device; sections 7–9 are reference material.
Section 1
Introduction
What Aquatara does
Aquatara measures the depth to the water surface in a borehole using sound. A small device with a speaker and a microphone sits on the borehole collar and connects to an Android phone over USB. The Aquatara app sends a short sound pulse down the borehole, records the echo reflected from the water surface and calculates the distance from the collar to the water.
Every measurement is stored on the phone together with the borehole it belongs to, the time, the operator and the recorded waveform, and can be sent by email for reporting.
How the measurement works
When you trigger a measurement, the speaker emits a 2 ms tone burst at 1 kHz while the microphone records. The microphone first picks up the outgoing pulse itself, then the echo returning from the water surface. The app finds these two peaks in the recording and measures the time between them, Δt. Because the sound travels down and back up, the distance to the water is
distance = Δt × c / 2
where c is the speed of sound in the air inside the borehole. The speed of sound depends on air temperature, so the temperature used in the calculation directly affects the result — a 1 °C error changes the measured distance by roughly 0.17 %, or about 17 cm at 100 m. This is why Aquatara lets you calibrate the temperature for each borehole.
What you need
- The Aquatara device, charged.
- An Android phone with a USB-C port (or a USB OTG adapter) and the Aquatara app installed.
- For calibration: a dip meter or tape to measure the water level by hand at least once per borehole.
- Optionally, an email app on the phone for sending readings.
The device has no buttons of its own — every measurement is started from the app. Check the battery indicator on the device before going to site.
Limitations
- The current version is designed for water levels of 8 m and deeper. Calibration requires a dipped distance of at least 8 m.
- Accuracy depends on the temperature used in the calculation. Without calibration the app uses the default temperature from the settings (15 °C unless changed).
- Obstructions in the borehole (pump, cables, joints, changes in diameter) and loud background noise can produce additional reflections. Check the received pulse chart when a result looks wrong.
Section 2
Getting started
Installing the app
Install the Aquatara app on your Android phone using the installation link provided by Aquatara. The app asks for two permissions:
- Microphone — required. Without it no measurement or calibration is possible.
- Location — optional. Used only to fill in borehole coordinates from the phone's GPS.
Connecting the device
- Plug the Aquatara device into the phone's USB port.
- Android may ask whether to open Aquatara for this USB device. Confirm — you can tick Always so the app opens automatically next time.
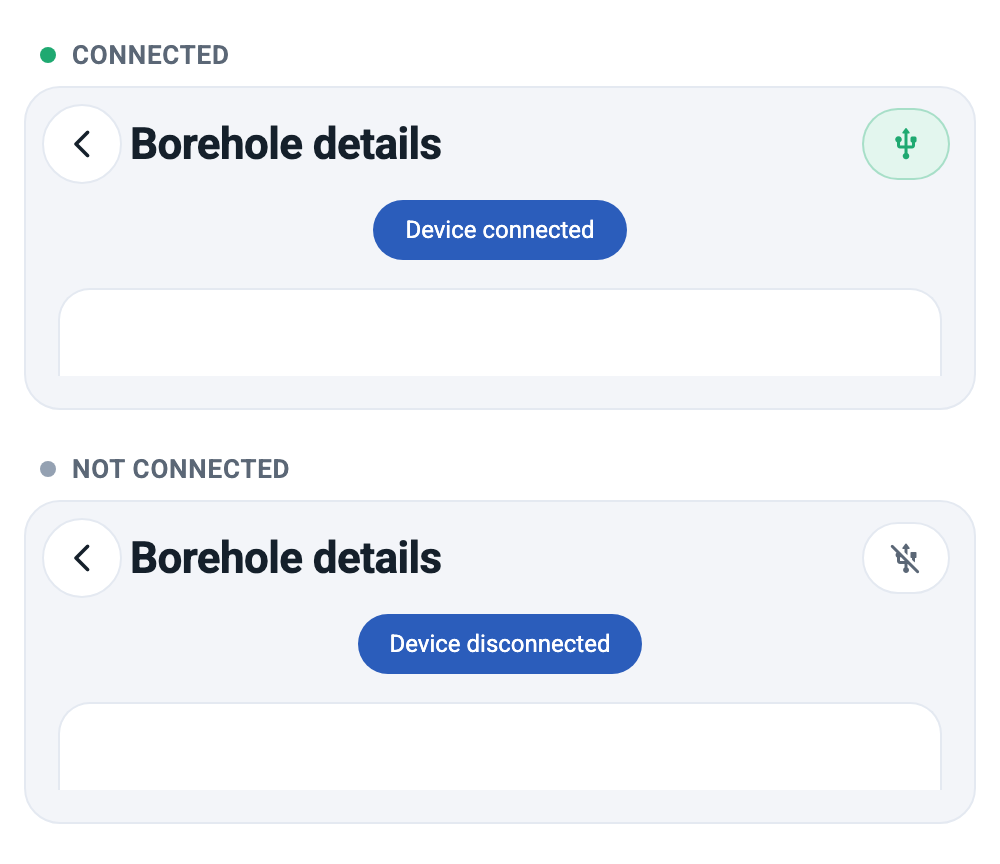
- The app shows a short Device connected message. The indicator in the top right corner of every screen turns green and shows a USB icon.
If the cable is unplugged, the app shows Device disconnected and the indicator changes to a grey, crossed-out USB icon. Always check the indicator before triggering a measurement — without the device the phone would use its own speaker and microphone and the result would not be meaningful.
The home screen
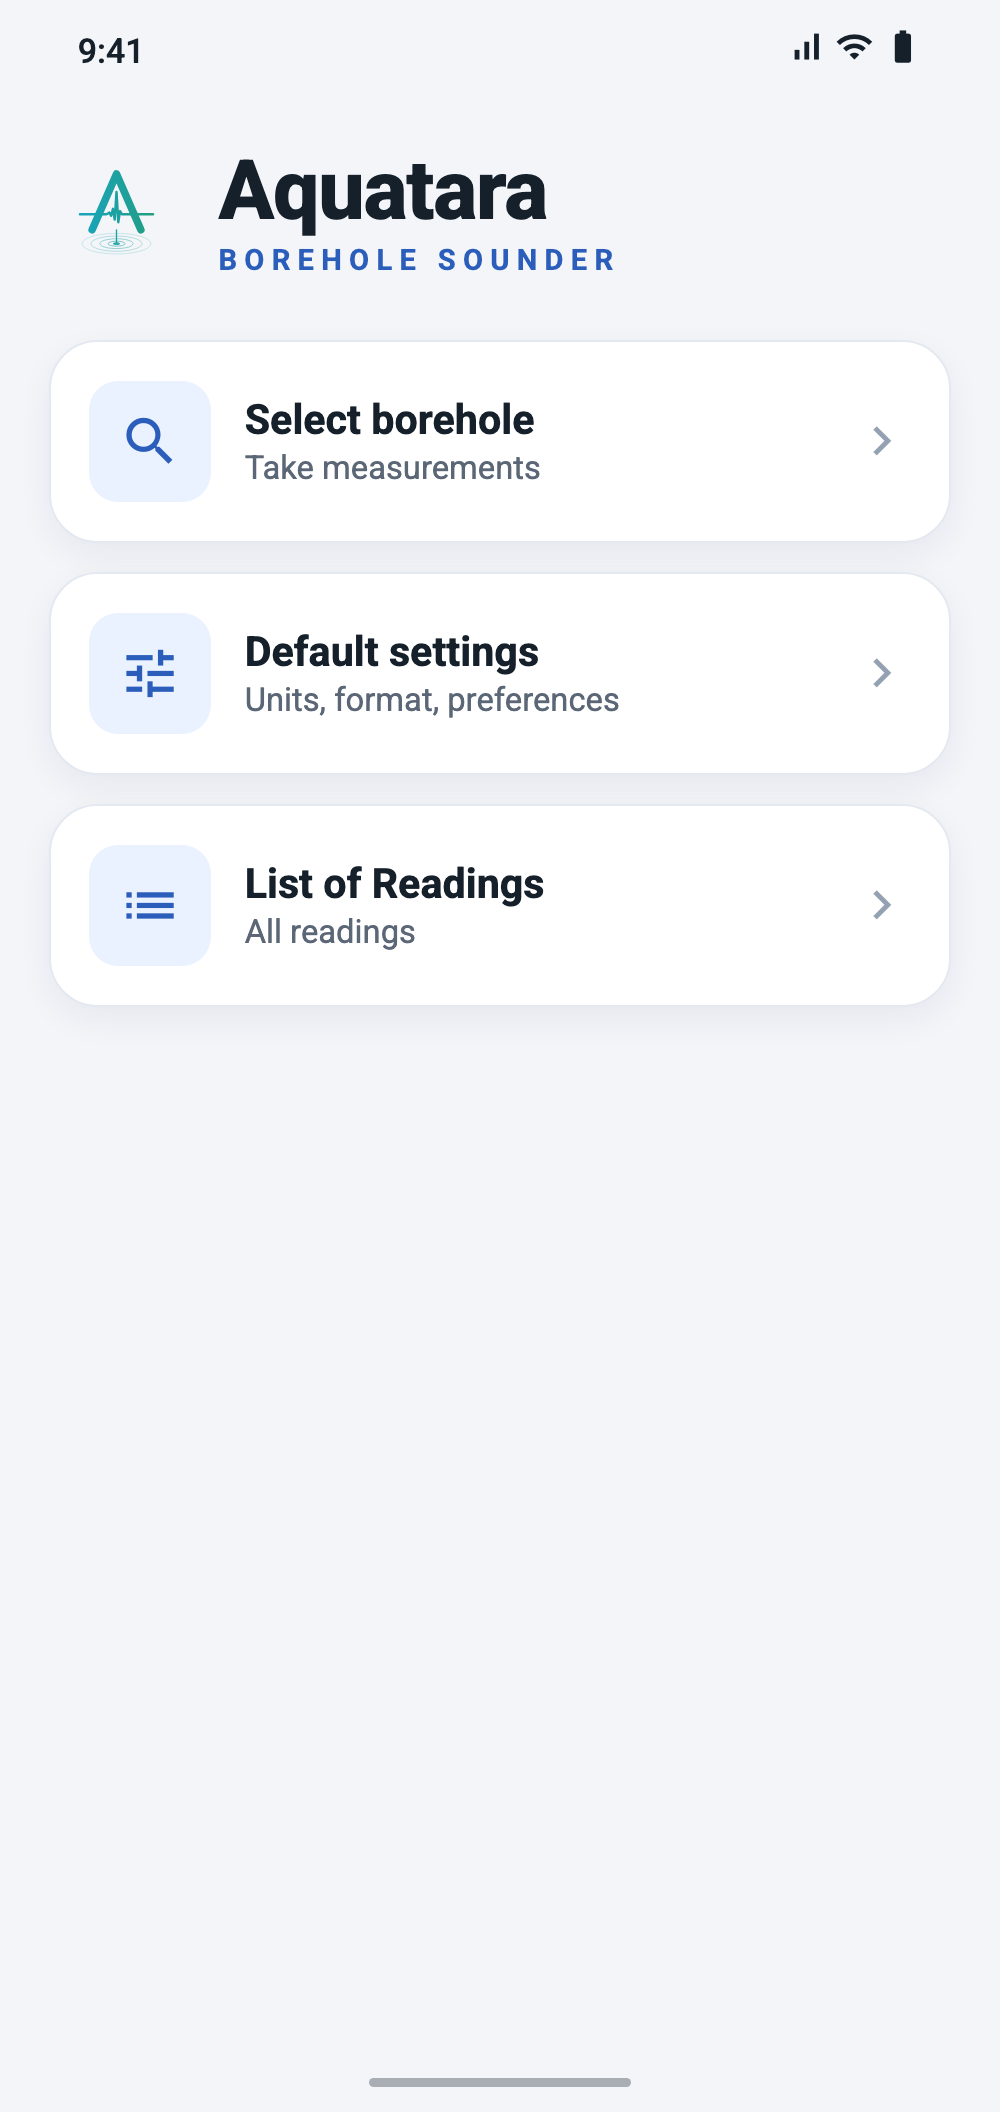
The home screen has three entries:
- Select borehole — create and open boreholes, and start measurements and calibrations from there.
- Default settings — units, operator, email and other preferences.
- List of Readings — all saved readings across all boreholes.
First-time setup
Before the first measurement, open Default settings and fill in at least:
- Units — distance (m, ft or yd) and temperature (°C, °F or K). All values in the app are entered and shown in these units.
- Operator — your name. It is stored with every reading you save.
- Organization and Default email to send measurement — used when readings are shared by email.
- Default temperature — a typical air temperature in boreholes in your region (see Why calibration matters for regional values).
- Default measurement range — the range of water levels you expect.
Tap Save at the bottom of the screen. All settings are described in the Settings reference.
Section 3
Managing boreholes
Every measurement belongs to a borehole. Create a borehole once and then use it for all calibrations and measurements at that site.
Creating a borehole
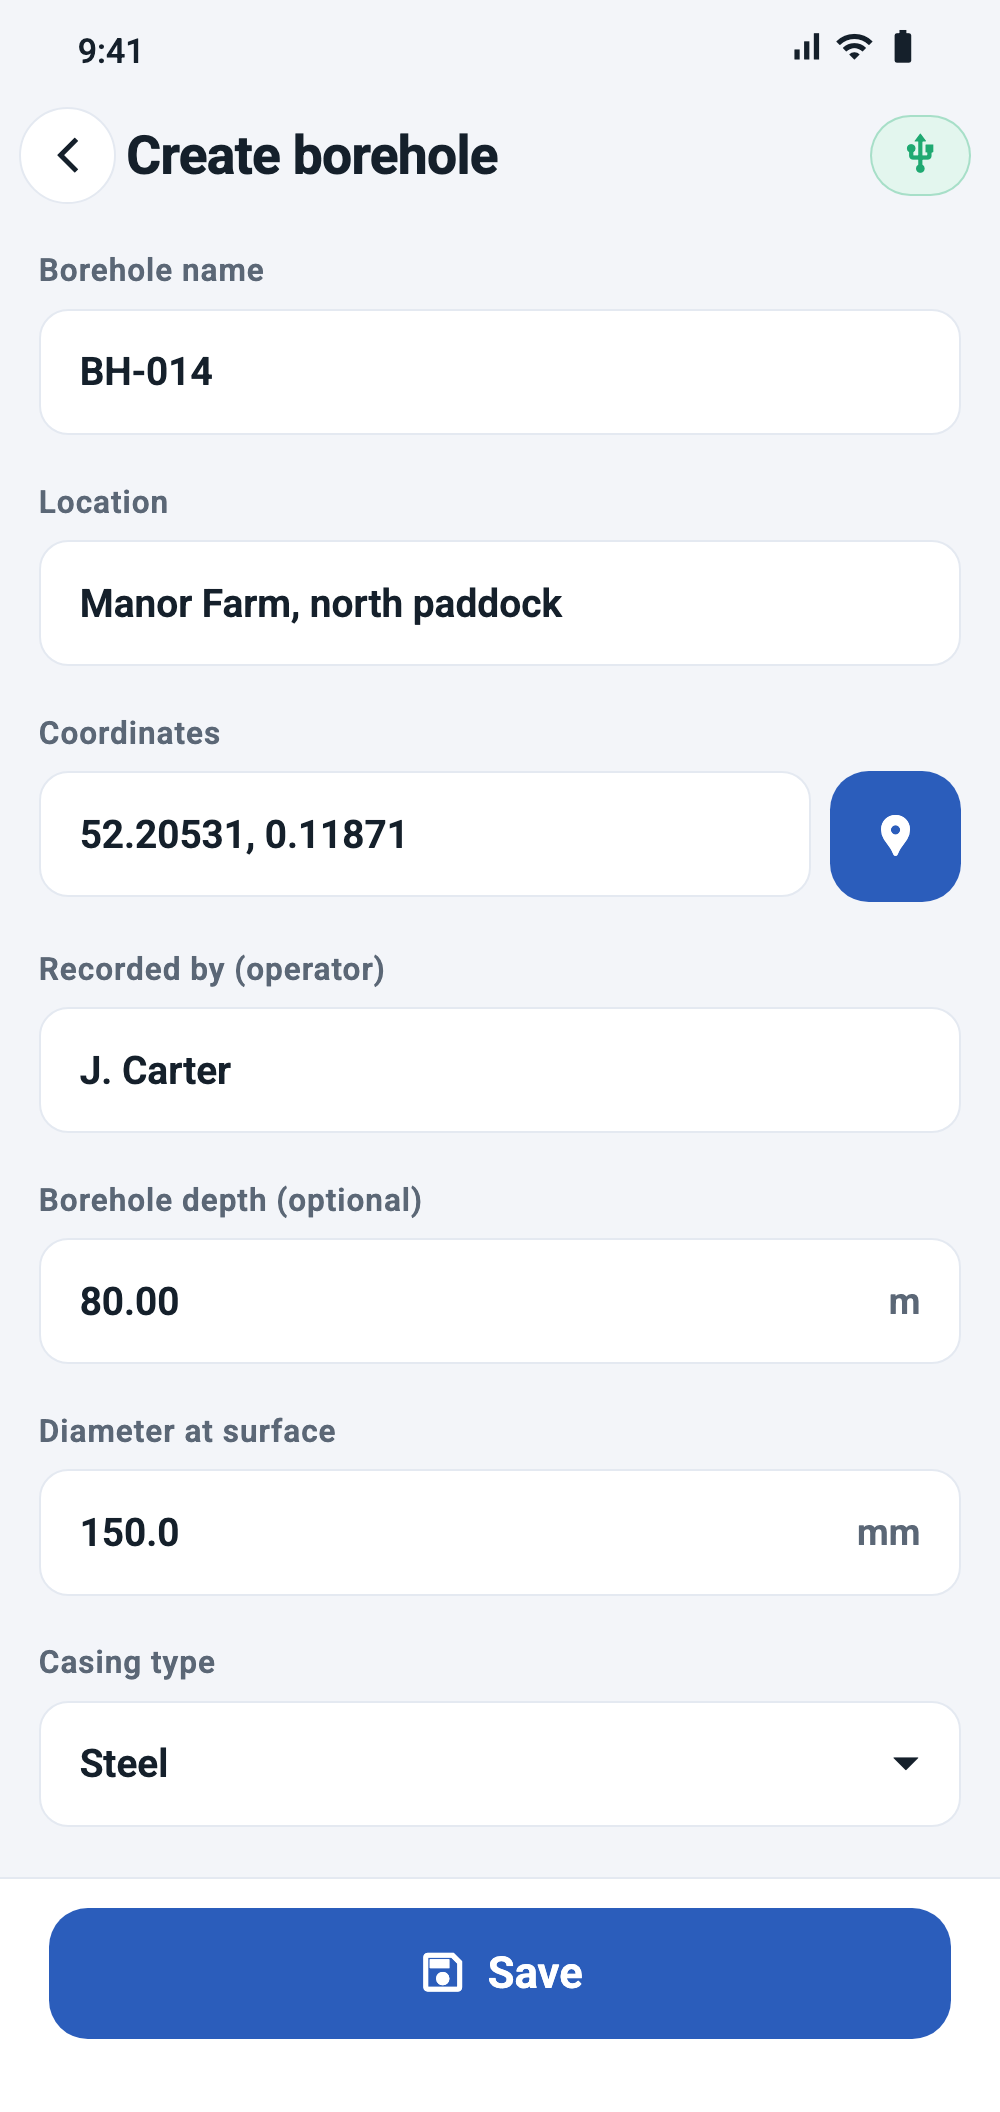
Go to Select borehole and tap Create borehole. Fill in the form and tap Save.
| Field | Description |
|---|---|
| Borehole name | Required and unique. This name identifies the borehole in lists, readings and emails. |
| Location | Free text, e.g. site or village name. |
| Coordinates | Tap the pin button to fill in the current GPS position of the phone. Stand at the borehole when you do this. |
| Recorded by (operator) | The person who registered the borehole. |
| Borehole depth (optional) | Total depth of the borehole, in the selected distance unit. |
| Diameter at surface | Inner diameter at the collar, in millimetres. |
| Casing type | Steel or PVC. |
| Has pump | Whether a pump is installed in the borehole. |
Finding a borehole
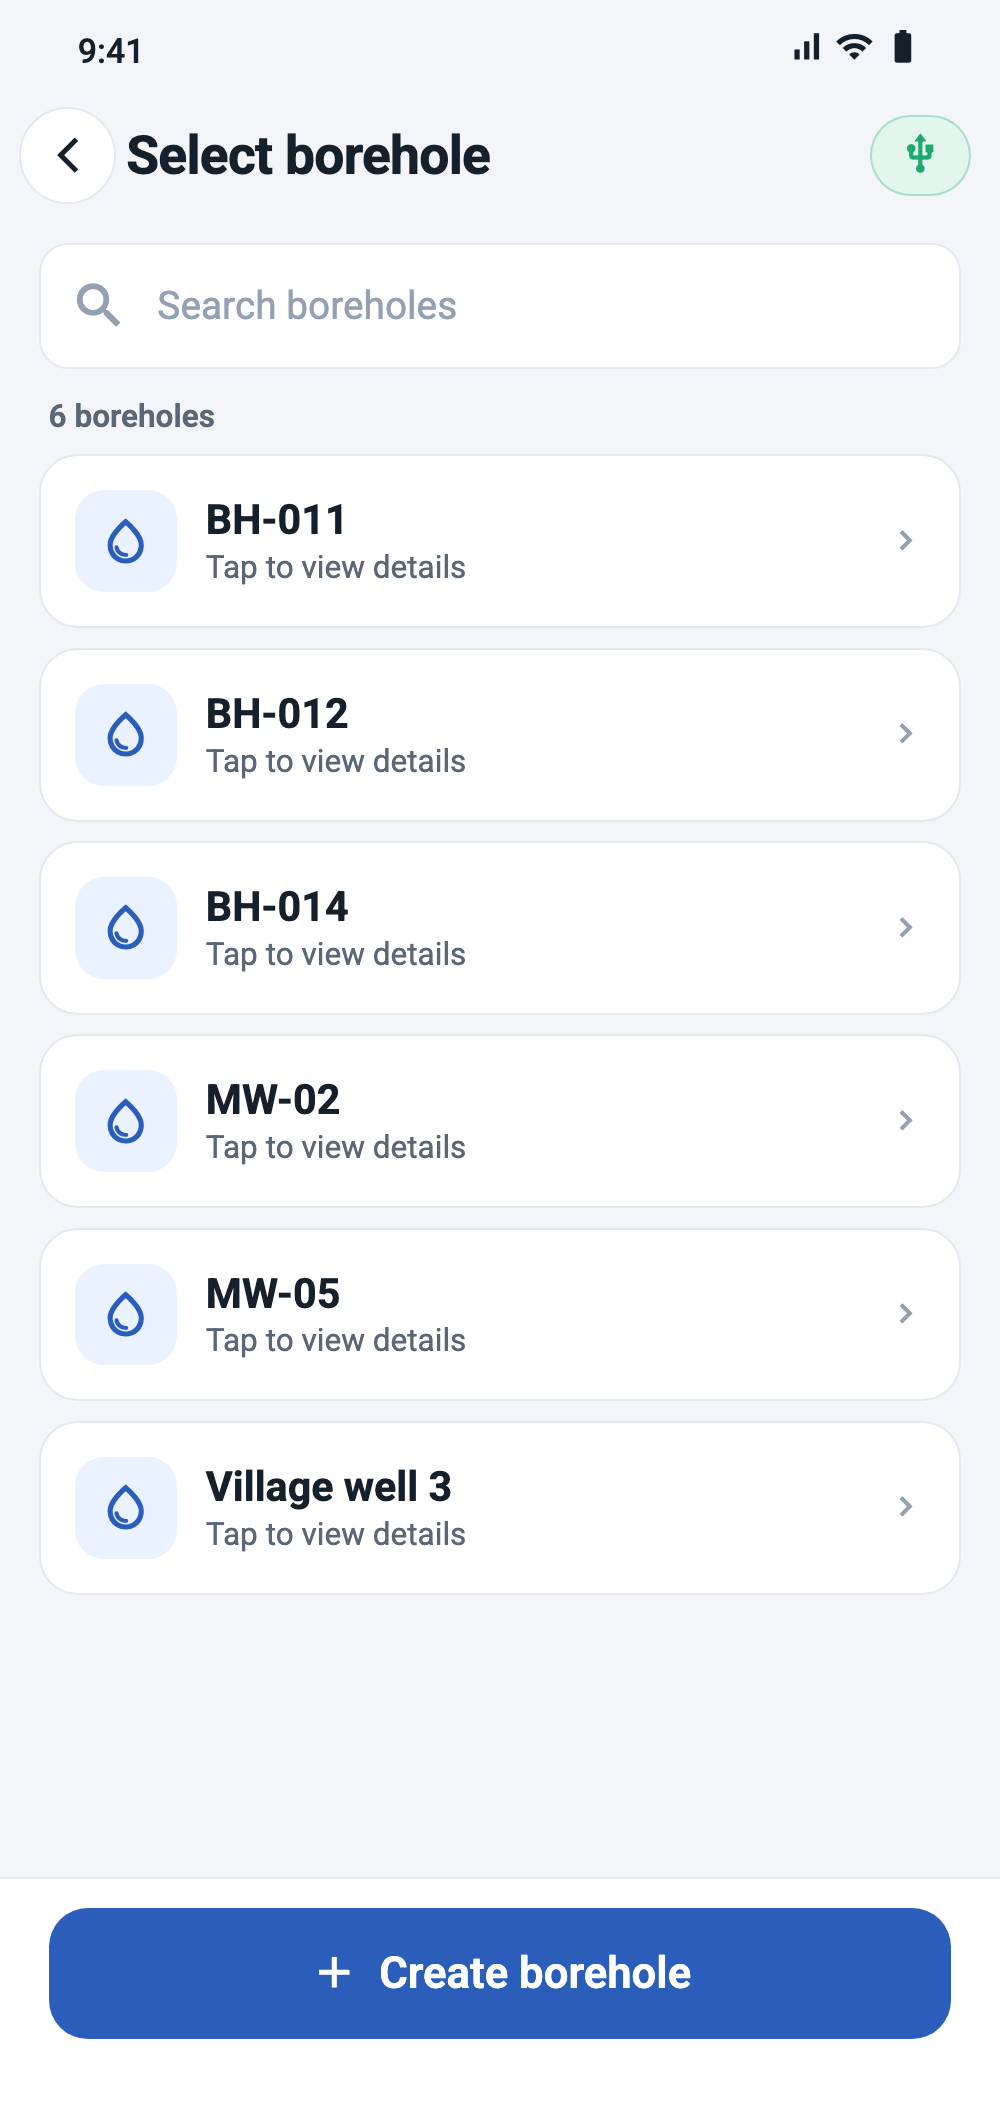
Select borehole lists all boreholes stored on the phone. To filter the list, type part of the borehole name in the search field and press Enter on the keyboard. The search is case-sensitive. Clear the field and press Enter again to show all boreholes.
Tap a borehole to open its details.
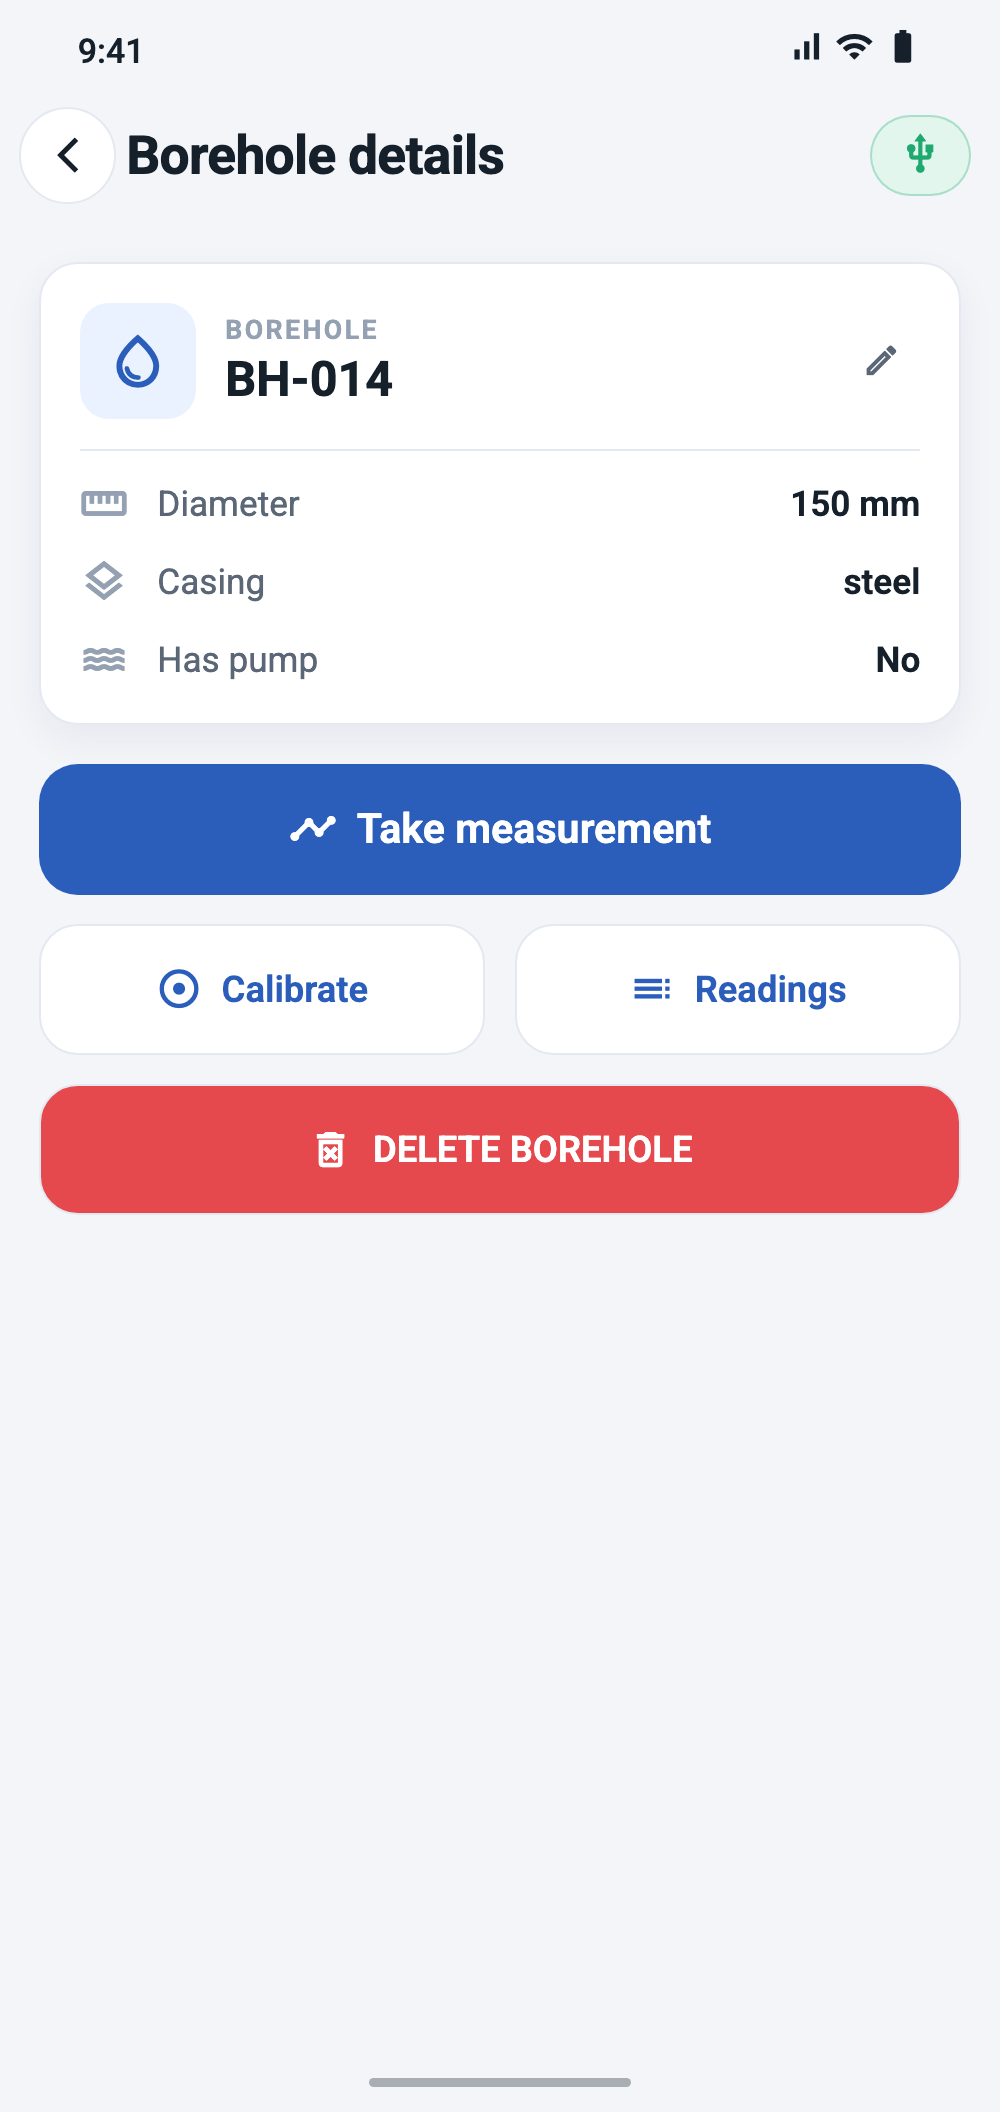
Borehole details
The details screen shows the borehole name, diameter, casing type and pump status, and gives access to all actions for this borehole:
- Take measurement — see Taking a measurement.
- Calibrate — see Calibration.
- Readings — readings saved for this borehole only.
- The pencil icon — edit the borehole fields.
- DELETE BOREHOLE — remove the borehole.
Section 4
Calibration
Why calibrate
The app converts the echo time into distance using the speed of sound, which depends on the air temperature inside the borehole. That temperature is often different from the air temperature at the surface and varies by region — see Why calibration matters.
Calibration works backwards: you measure the water level once by hand, Aquatara measures the echo time, and the app calculates the temperature that makes the two agree. This calibrated temperature is saved with the borehole and used for later measurements there.
Calibrate a borehole:
- before the first measurement at that borehole;
- when conditions change significantly, e.g. between seasons;
- whenever a manual dip check disagrees with Aquatara readings.
Calibration procedure
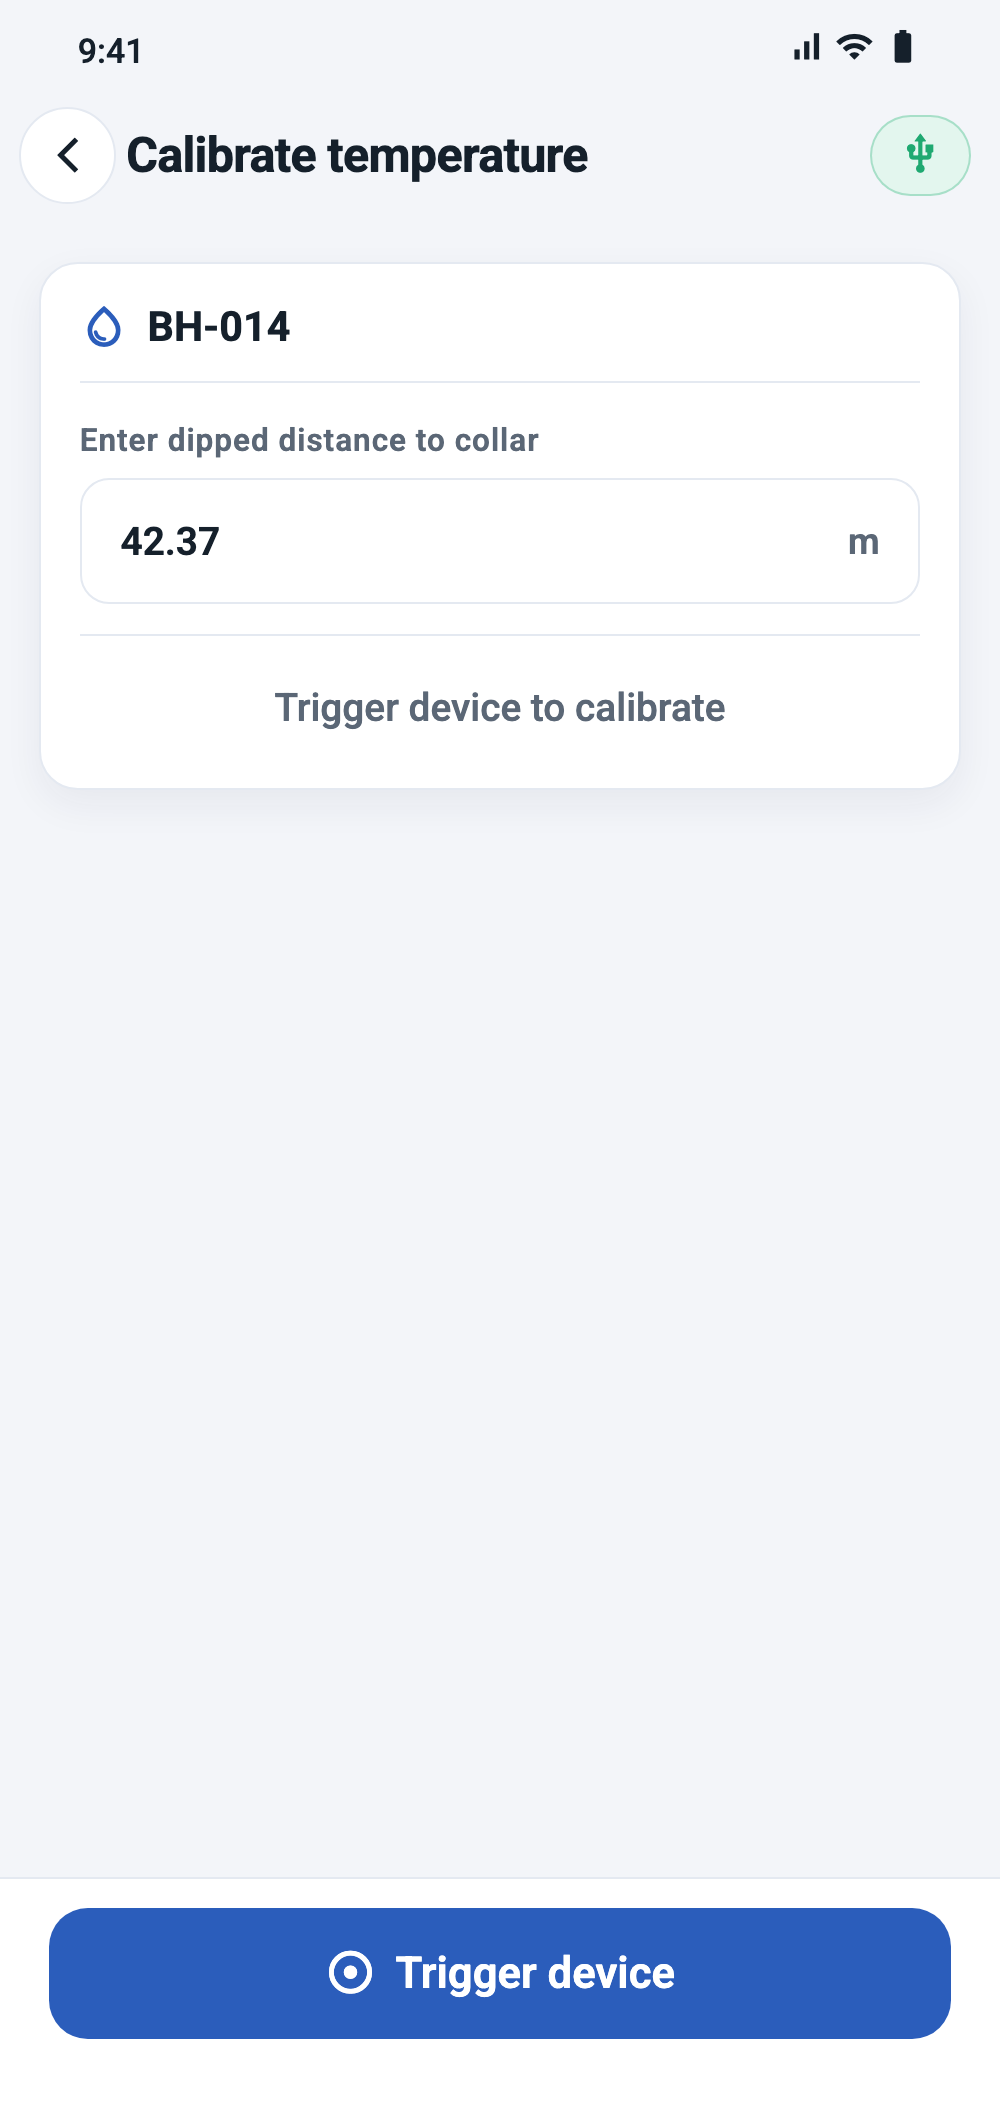
- Measure the distance from the collar to the water surface with a dip meter. Use the same reference point on the collar where the device will sit. The distance must be at least 8 m.
- Open the borehole and tap Calibrate.
- Enter the measured value in Enter dipped distance to collar, in the selected distance unit.
- Check that the device is connected and place it on the collar, pointing vertically down.
- Tap Trigger device and keep the device still until the result appears.
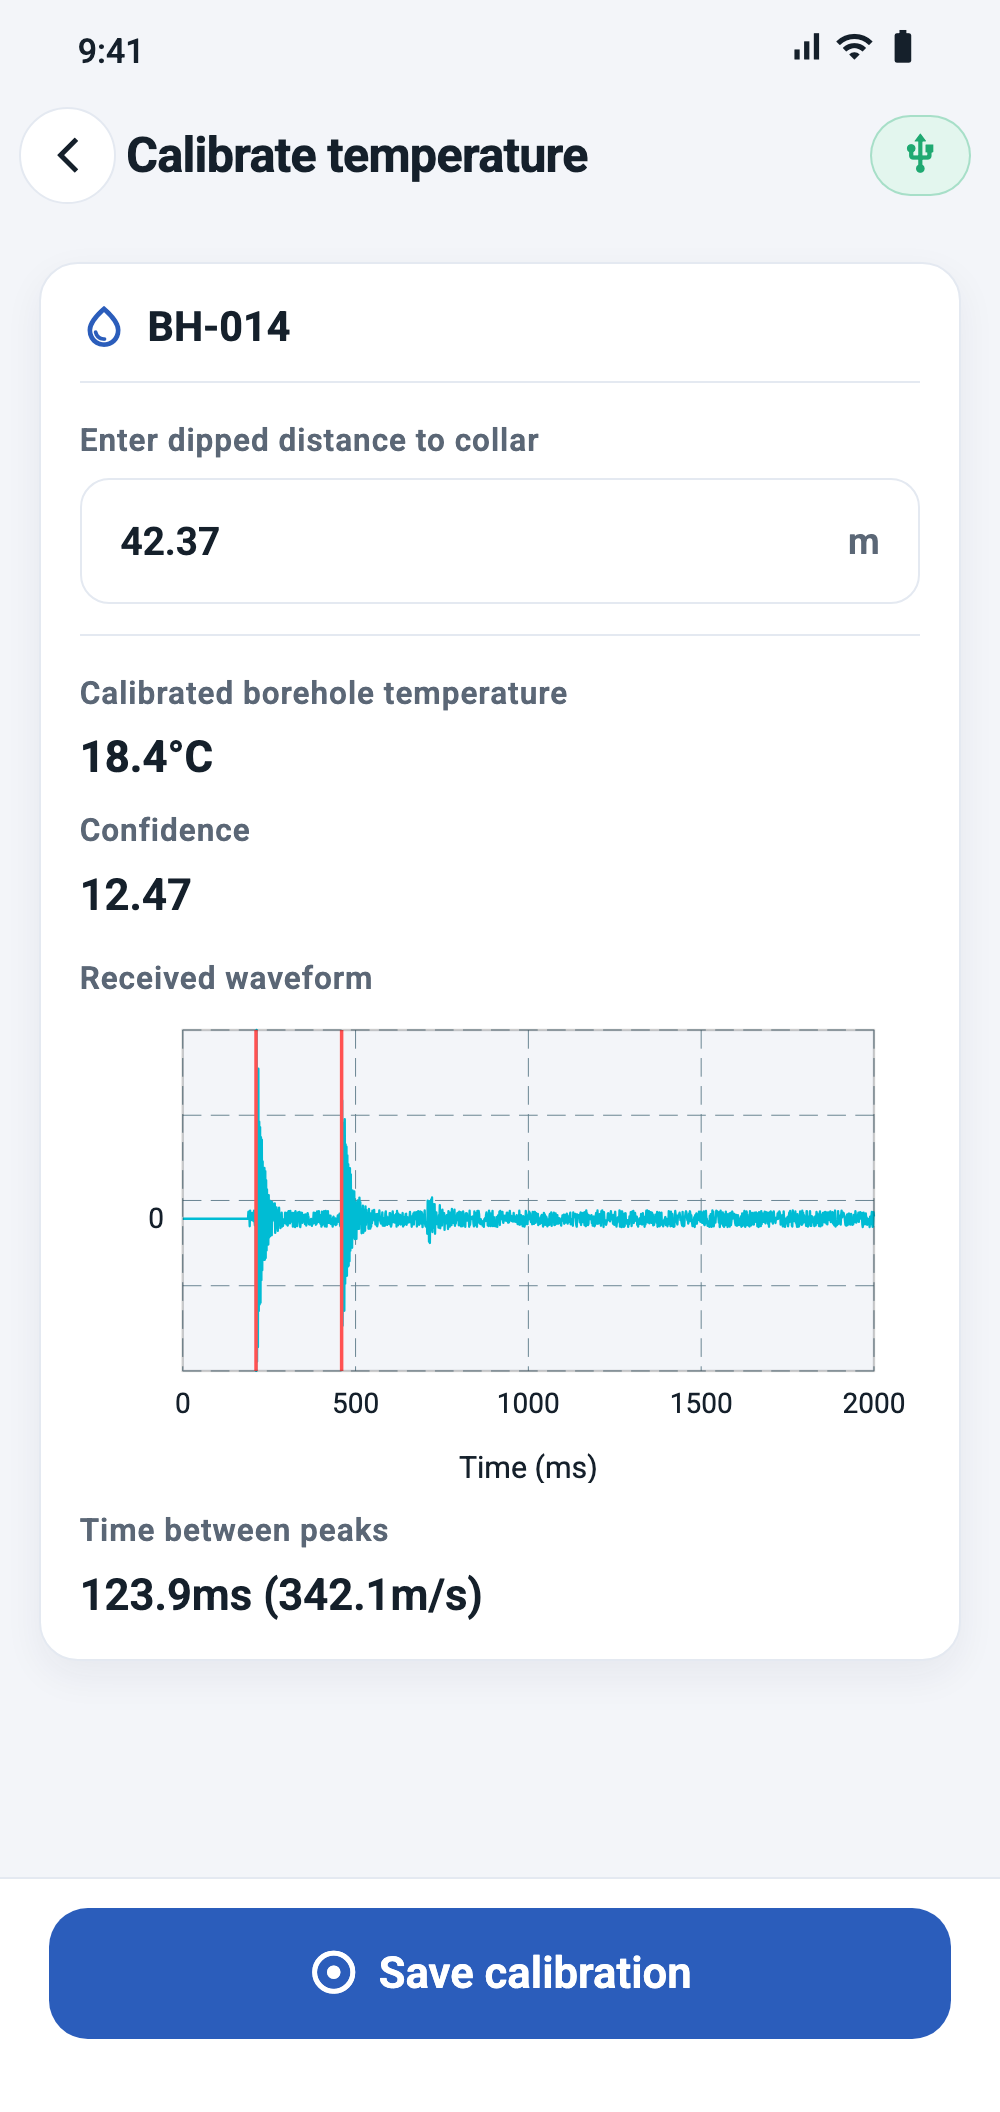
- Review the result (see below). If it looks plausible, tap Save calibration.
Reading the calibration result
| Value | Meaning |
|---|---|
| Calibrated borehole temperature | The air temperature that matches the dipped distance and the measured echo time. This value is saved with the borehole. |
| Confidence | How clearly the detected peak stands out from the rest of the recording. See Glossary. |
| Received waveform | The recorded signal. Red vertical lines mark the two detected peaks. |
| Time between peaks | One-way travel time (half the interval between the two peaks) and the resulting speed of sound. |
A calibrated temperature far outside the range you would expect for the region usually means the wrong peak was detected. Check the waveform, then repeat the calibration.
Section 5
Taking a measurement
Before you start
- The device is charged and the indicator in the app shows it is connected.
- The phone is not muted. The app raises the media volume to at least 50 % automatically, but cannot override mute.
- The device sits on the collar, pointing vertically down into the borehole.
- The surroundings are as quiet as possible — running engines, pumps and wind can mask the echo.
Measurement range and temperature
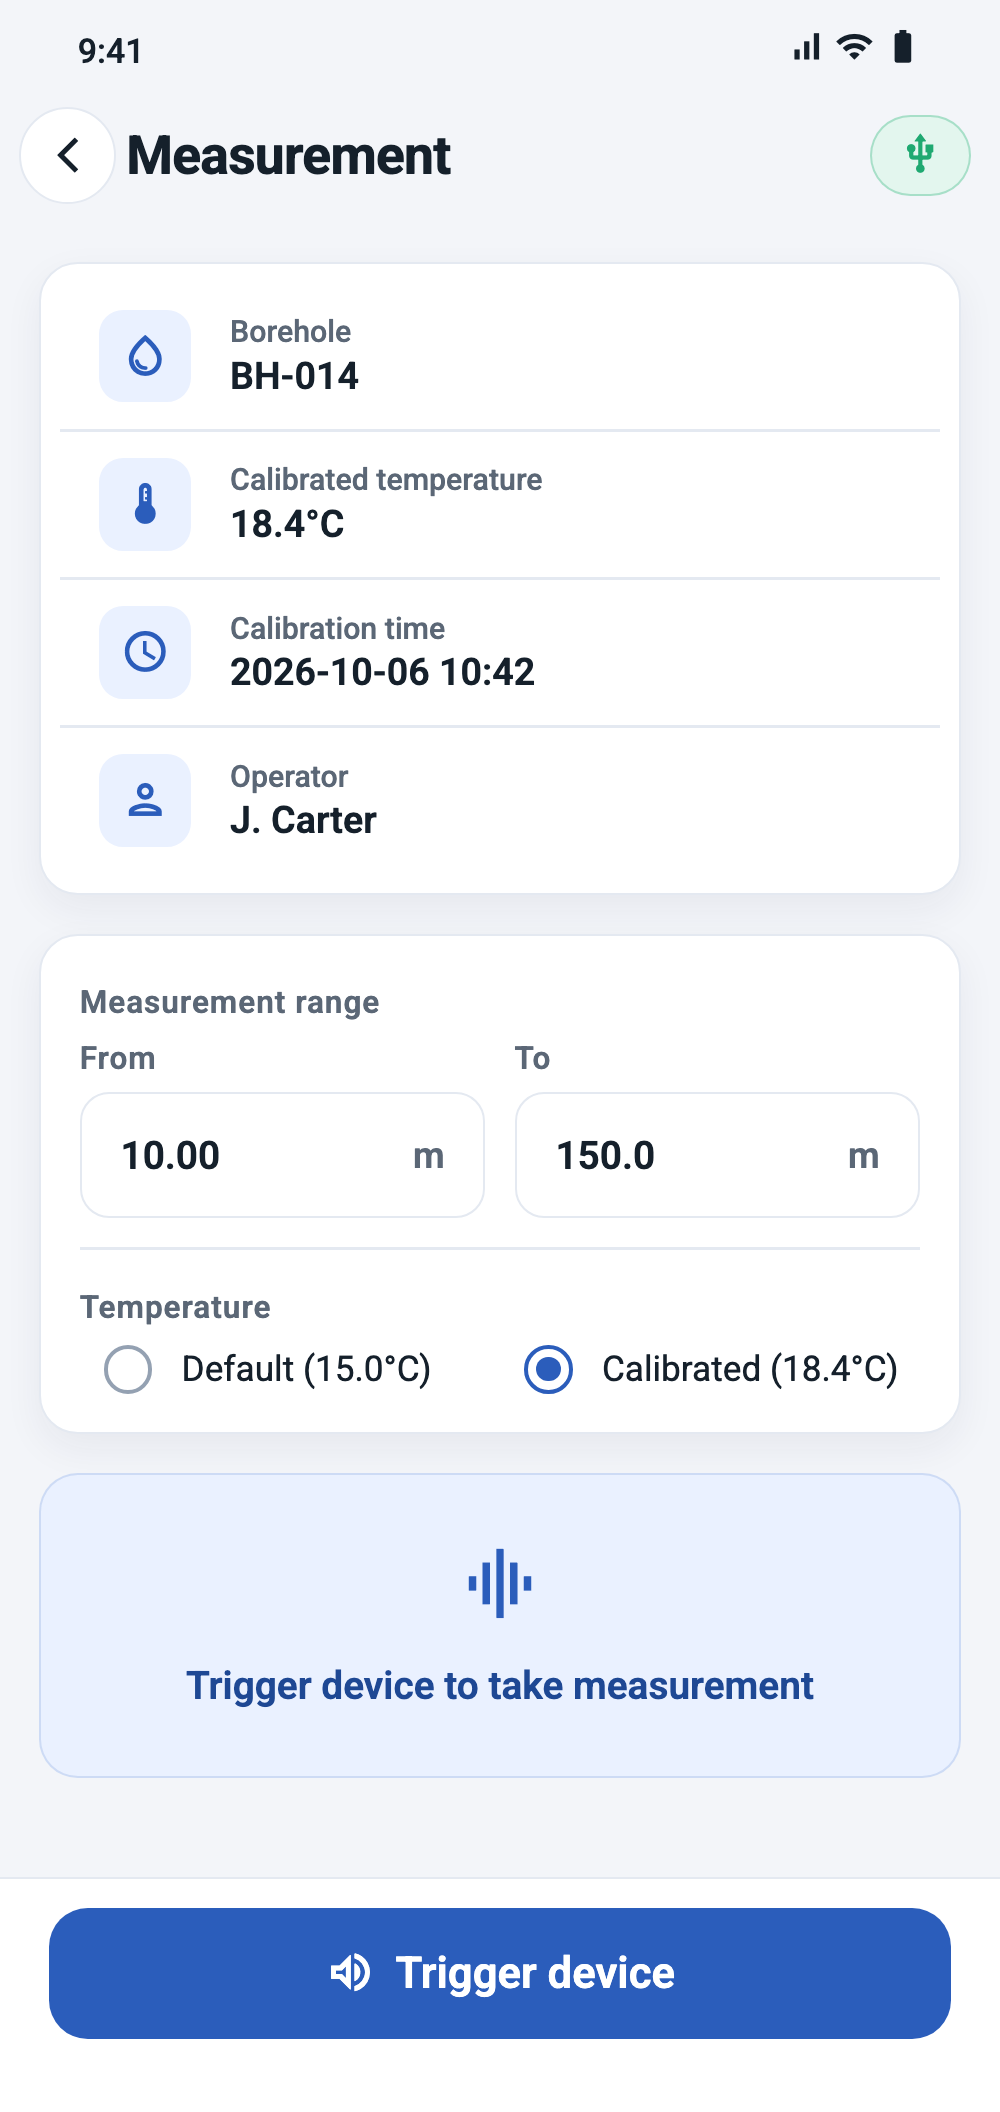
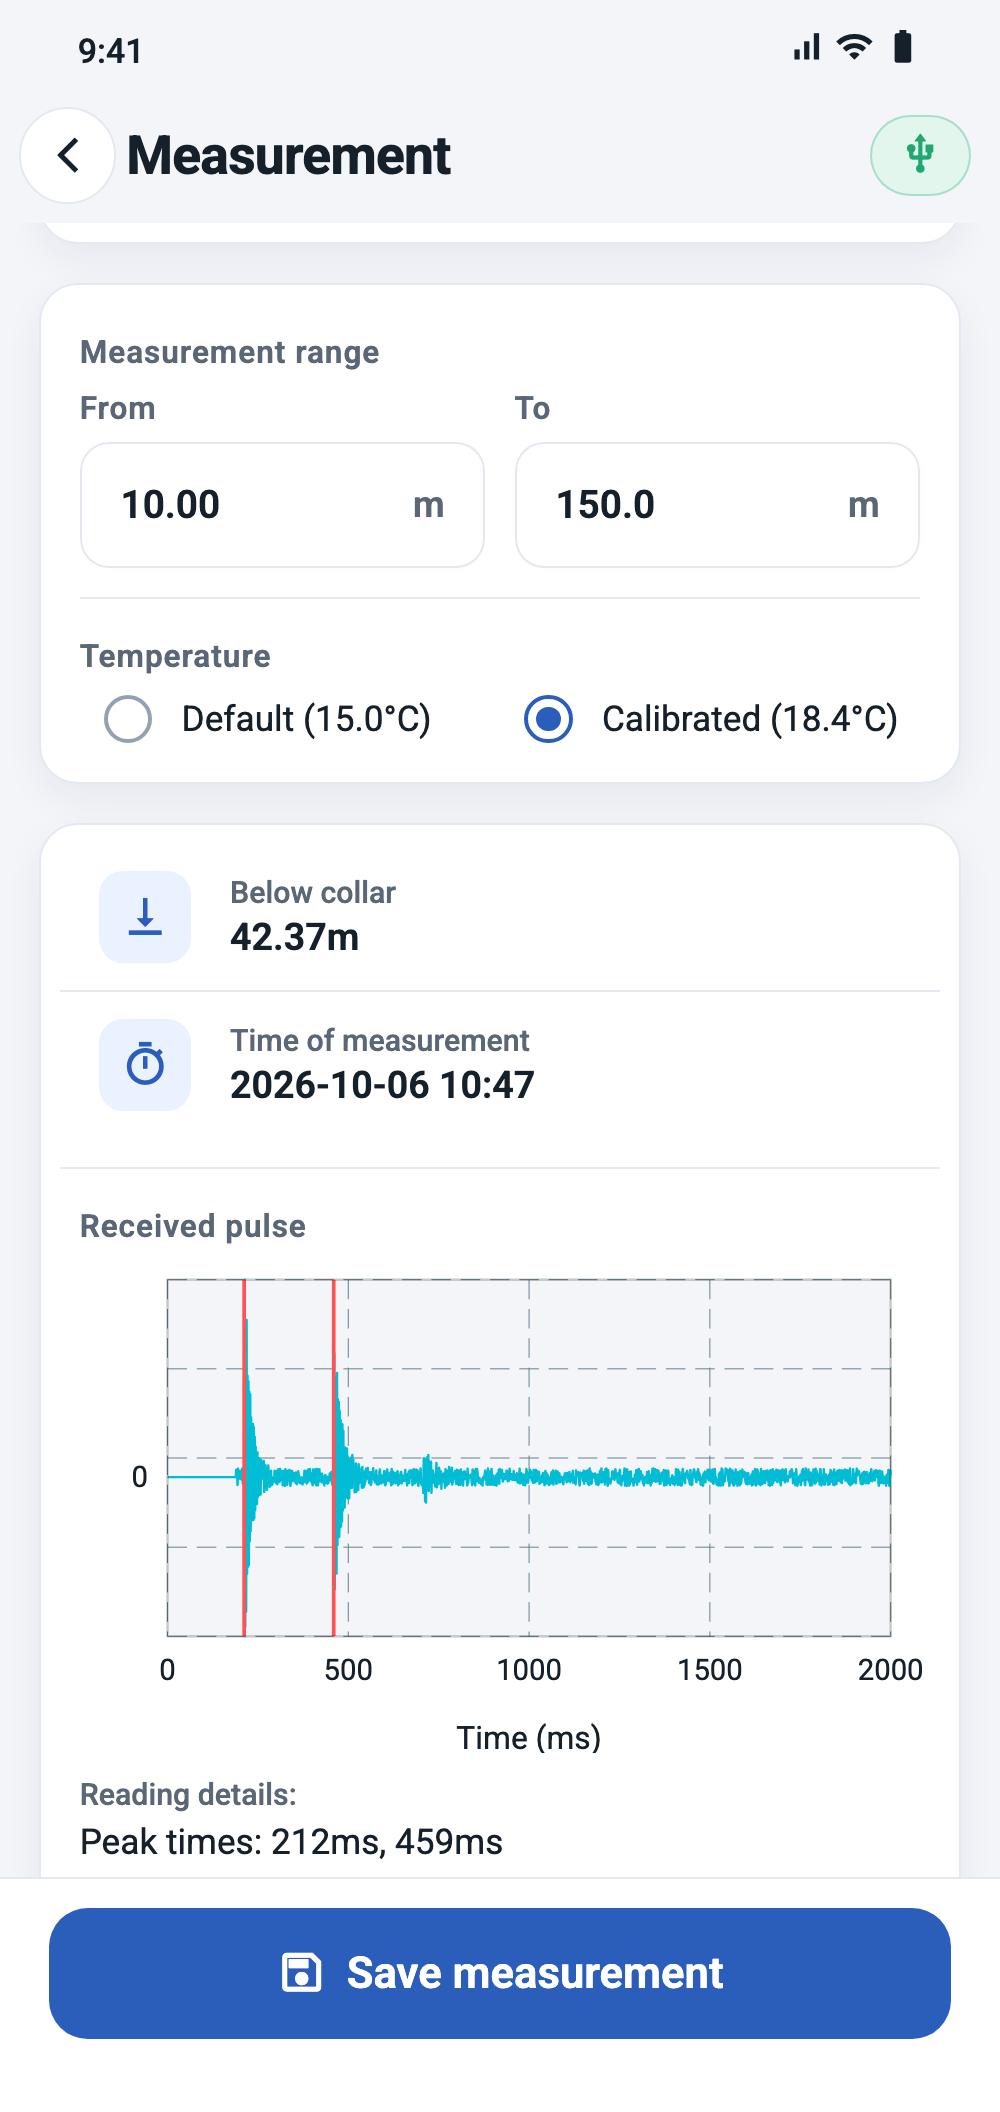
Open the borehole and tap Take measurement. Before triggering, check two settings on the screen:
Measurement range (From / To) is pre-filled from the default settings.
- To sets how long the app listens for the echo. It must be greater than the expected water level; a much larger value only makes the recording longer.
- From sets the shortest distance the app will accept. Reflections that would correspond to a shorter distance are ignored. Setting From a little below the expected water level helps to skip reflections from joints, pumps or cables near the top of the borehole.
Temperature selects the temperature used for the calculation:
- Calibrated (selected by default) — the temperature saved during calibration of this borehole. If the borehole has not been calibrated, the default temperature is used.
- Default — the default temperature from the settings.
Triggering and reading the result
Tap Trigger device. The device emits the pulse and the app records for a few seconds, then shows the result:
| Value | Meaning |
|---|---|
| Below collar | The measured distance from the collar to the water surface. Shows “Failed to estimate depth!” if no echo could be identified. |
| Time of measurement | Date and time of the recording. |
| Received pulse | Chart of the recorded signal with the detected peaks marked in red. |
| Peak times | Time of the two detected peaks from the start of the recording, in ms. |
| Peak magnitudes | Height of the two peaks relative to the loudest point of the recording (0–1). |
| Confidence (rms) | How clearly the detected peak stands out from the rest of the recording. Higher values mean a cleaner signal. |
| Speed of sound | The speed of sound used for the calculation, derived from the selected temperature. |
Interpreting the received pulse chart
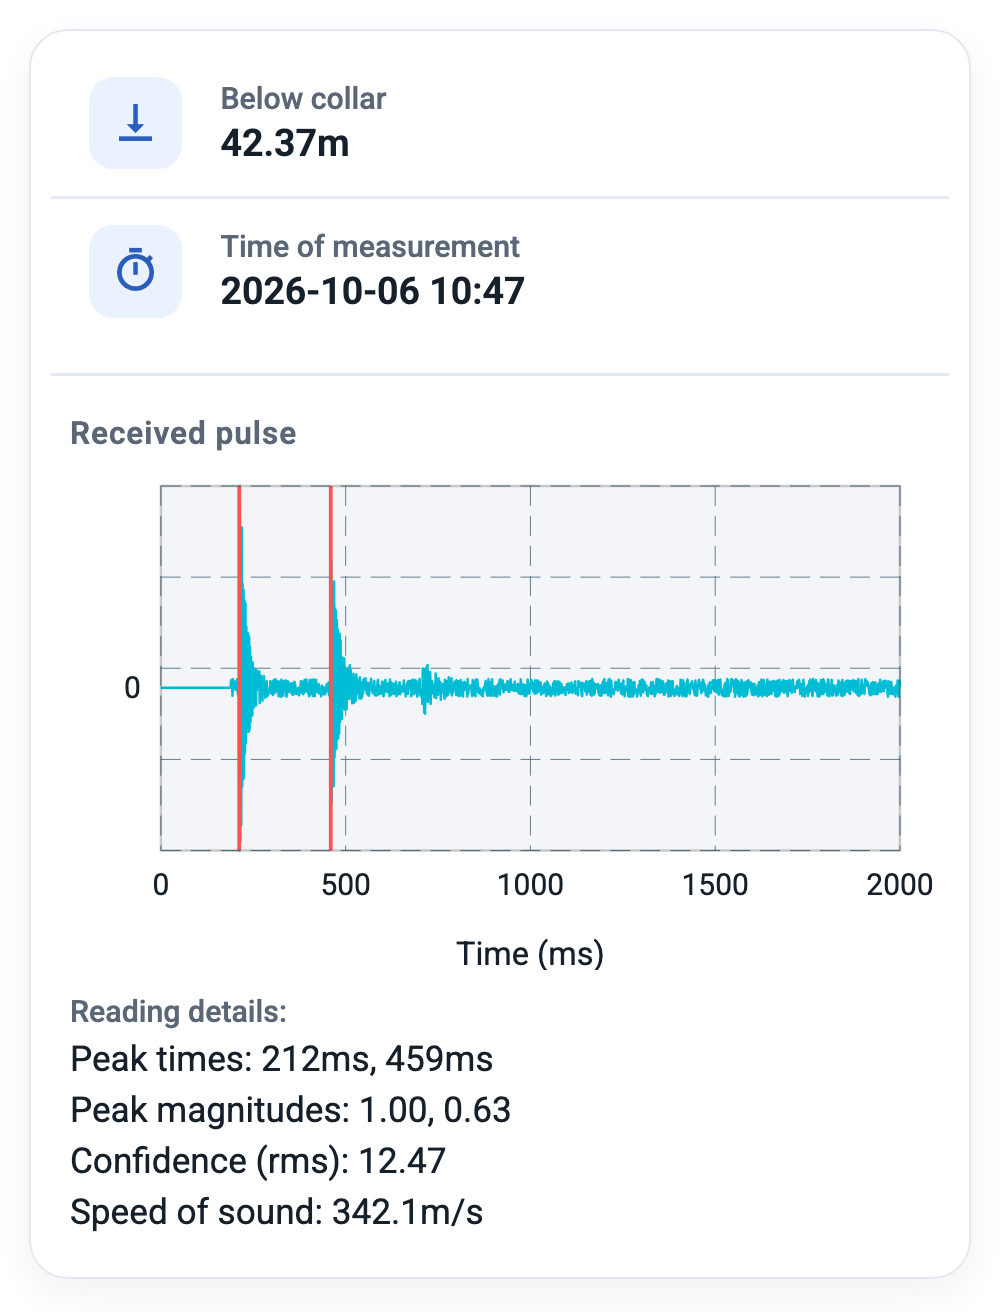
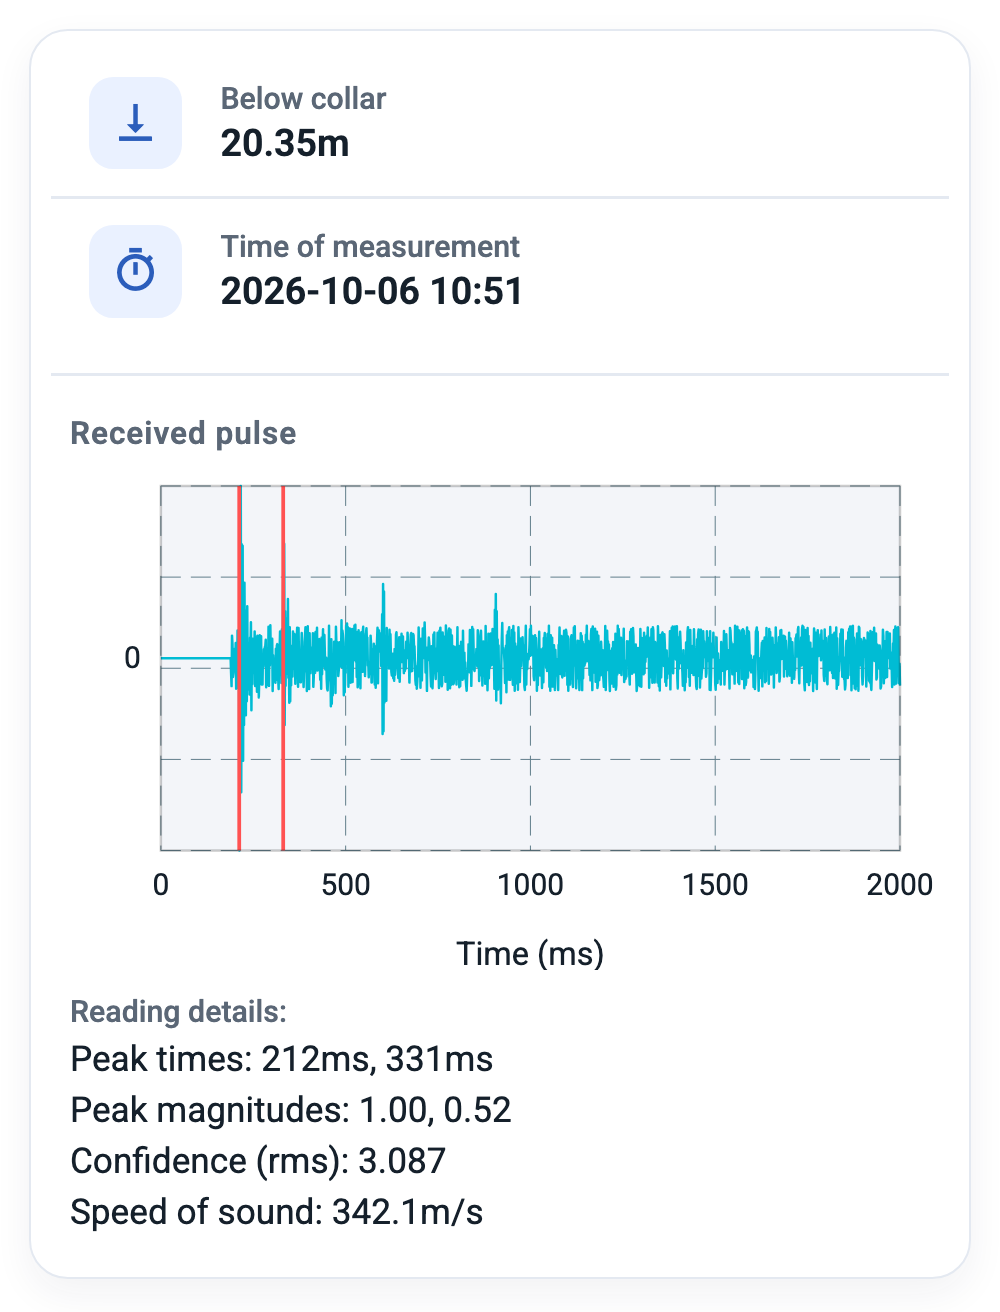
The chart shows the amplitude of the recorded sound over time. Two red vertical lines mark the peaks the app used: the first is the outgoing pulse, the second is the echo from the water surface. The distance between the two lines corresponds to the measured water level.
In a good measurement the two peaks clearly rise above the rest of the signal. If the second line sits on a small bump among many similar ones, or the chart shows several strong peaks, the app may have picked the wrong reflection — adjust From / To and repeat the measurement.
The horizontal axis can show time in milliseconds or distance (with zero at the first peak) — see Chart abscise axis label in the settings.
Saving the measurement
After a successful measurement the main button changes to Save measurement. Tap it to store the reading. The reading is saved with the borehole name, time, the operator name from the default settings, the borehole coordinates and the recorded waveform.
To repeat a measurement instead of saving it, go back to the borehole and tap Take measurement again.
Section 6
Viewing & sharing readings
Readings list
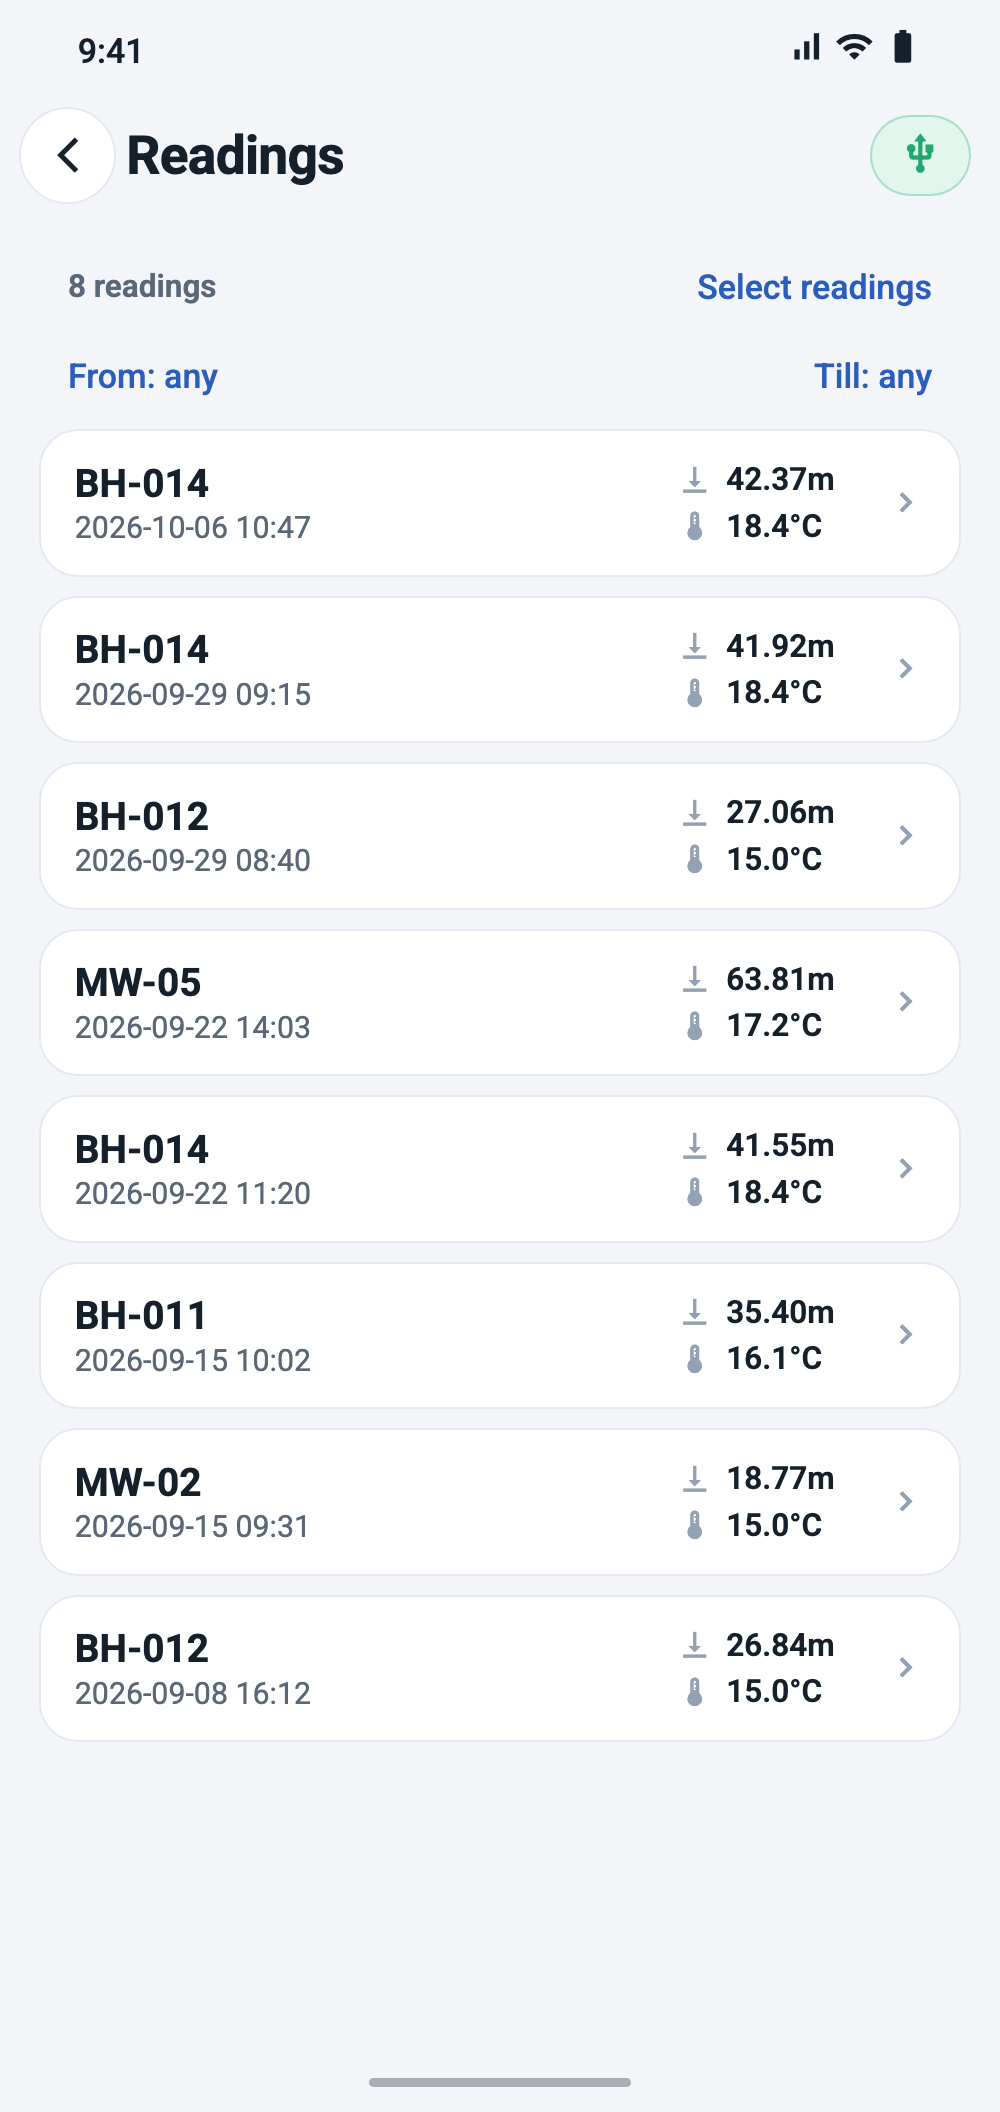
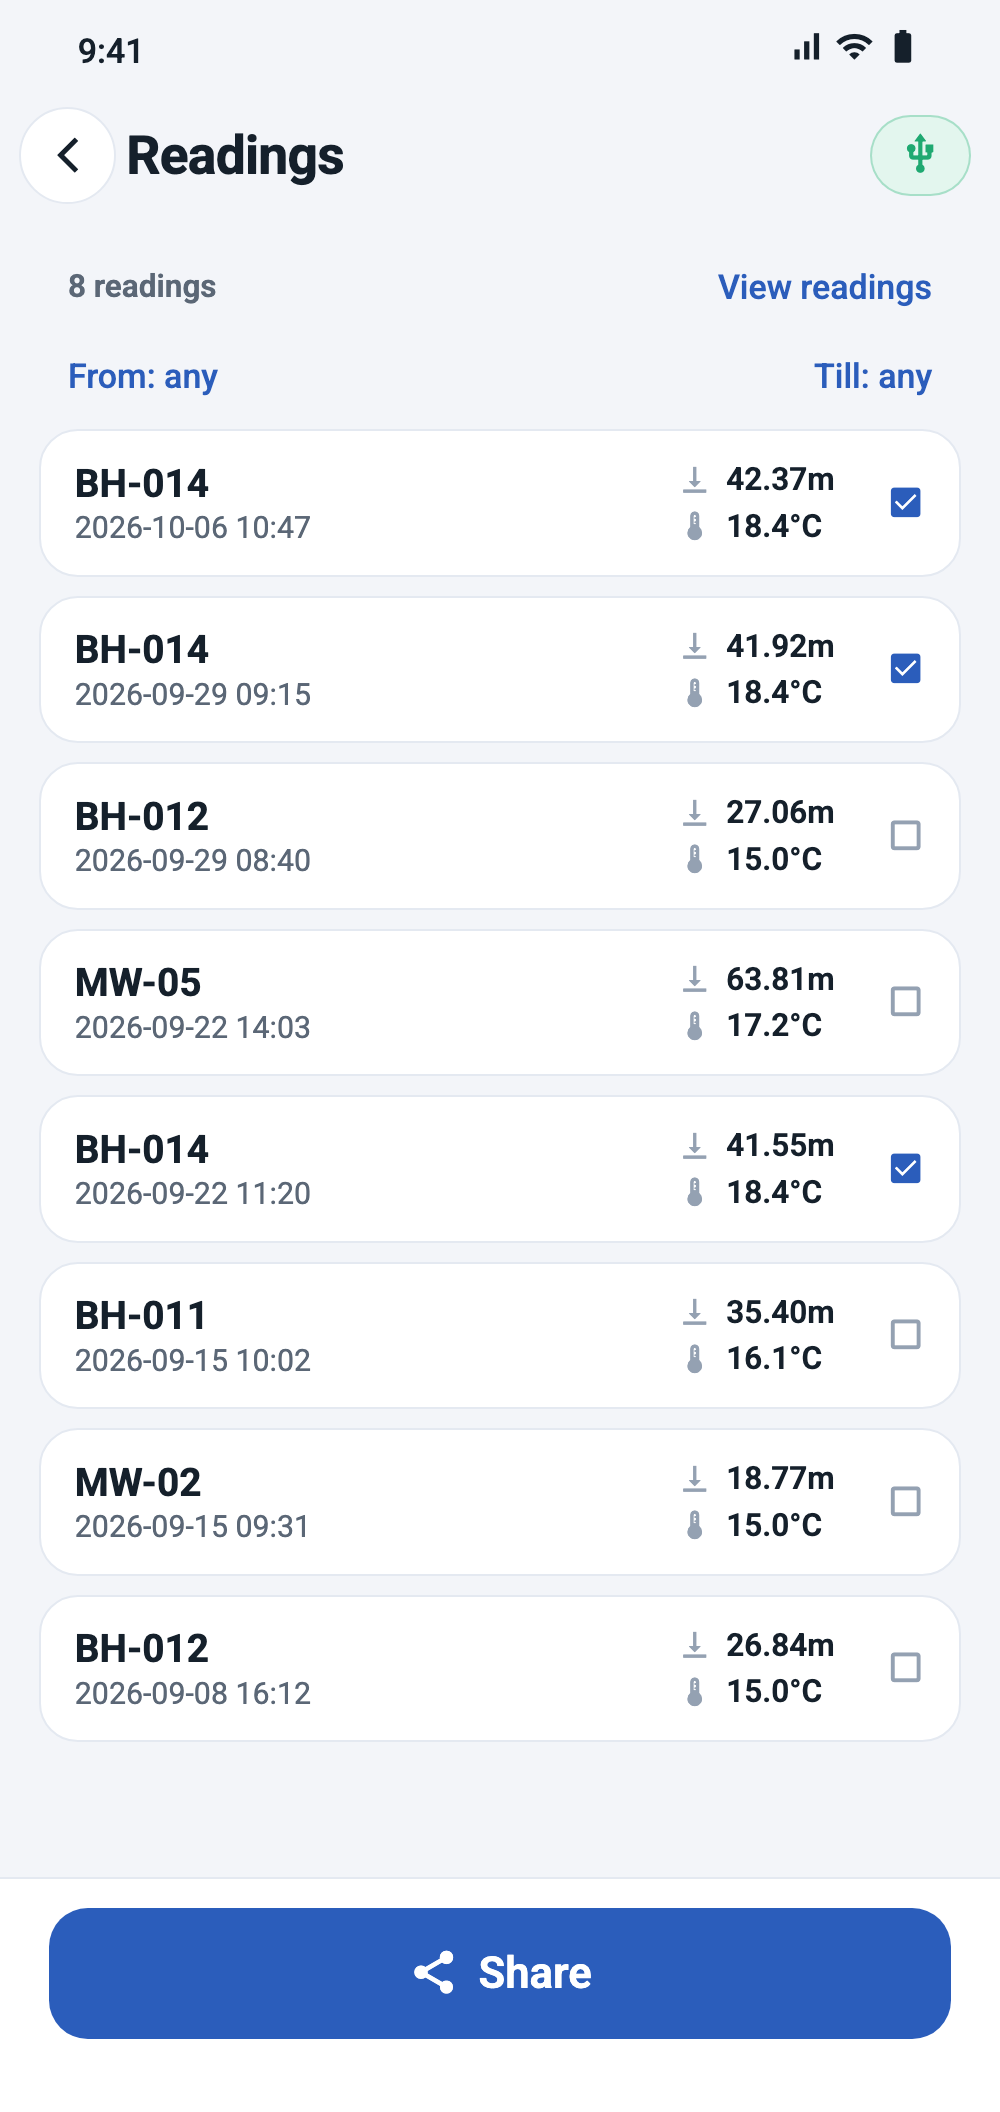
List of Readings on the home screen shows readings from all boreholes. Readings on a borehole's details screen shows only that borehole's readings. Each entry shows the borehole name, date and time, measured depth and the temperature used.
Use From and Till above the list to limit it to a date range. Tap a reading to open its details.
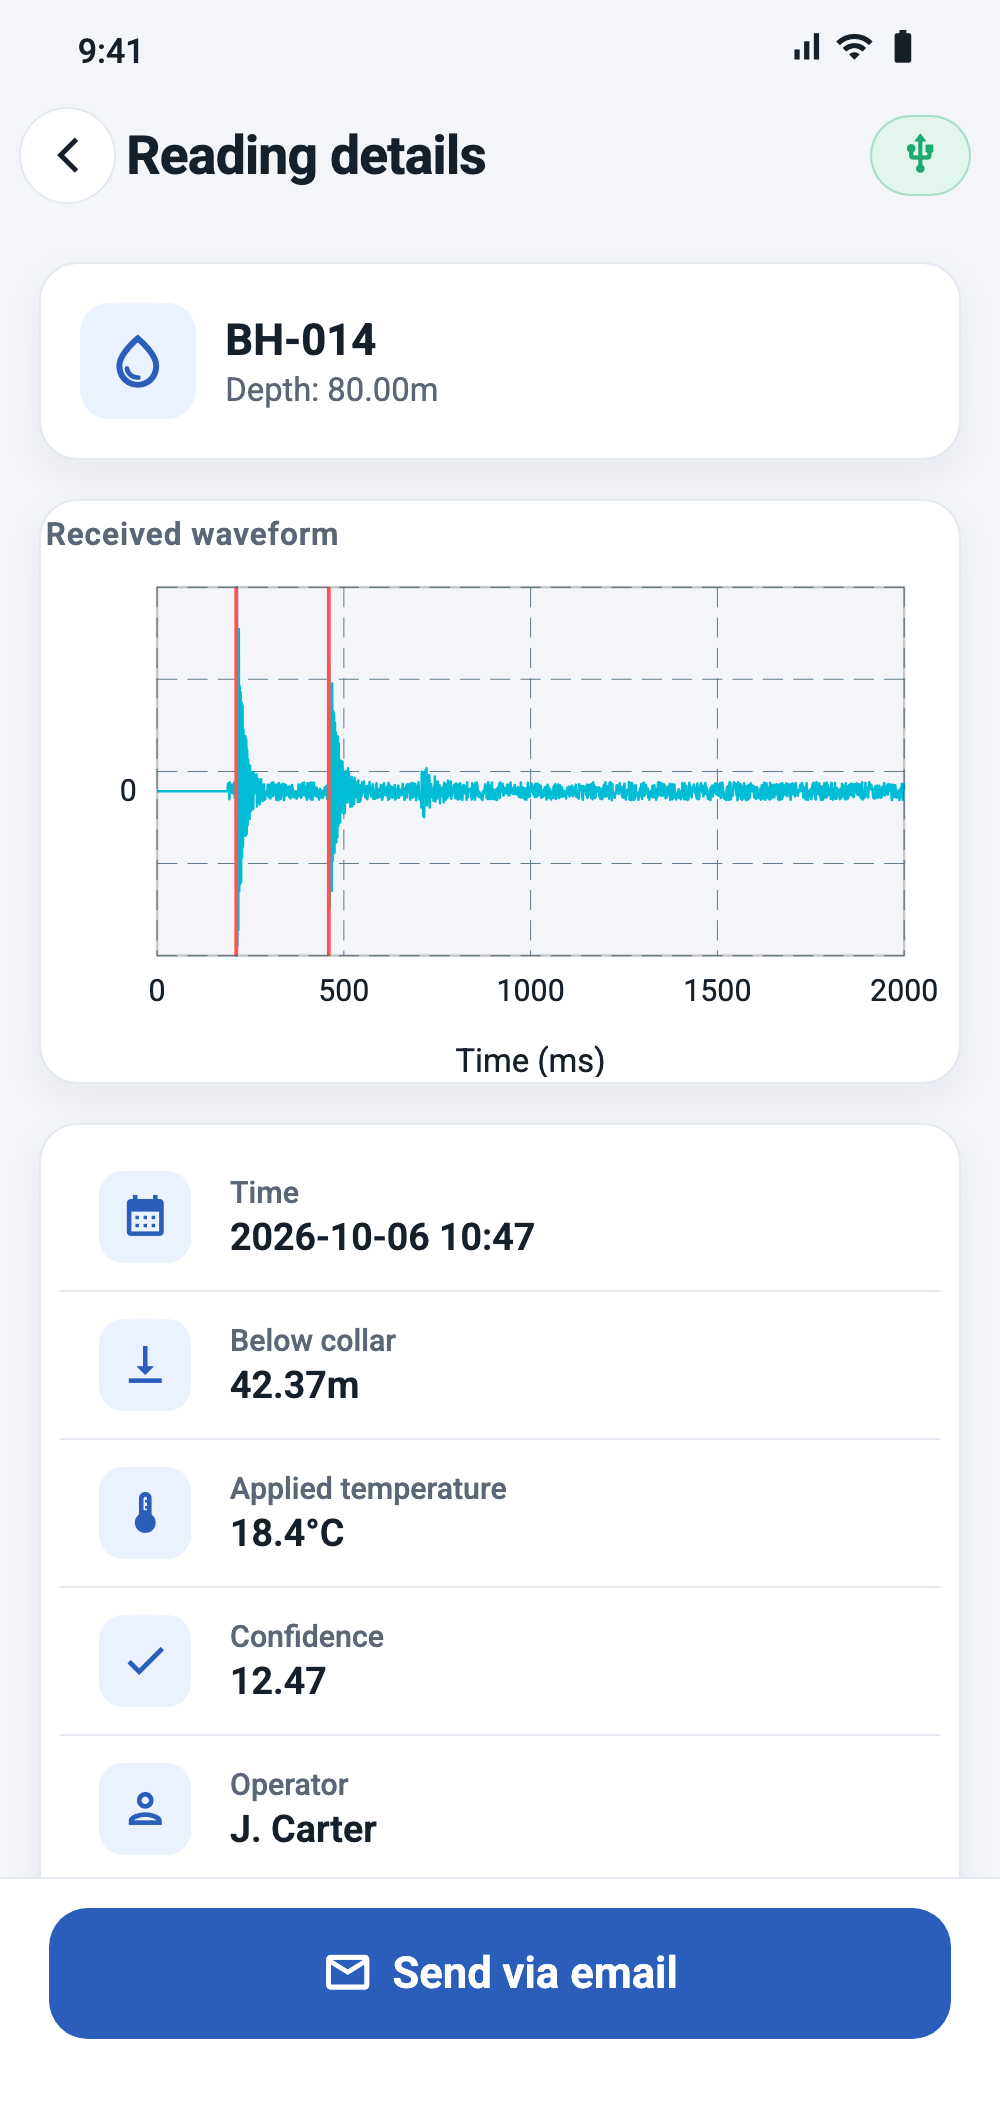
Reading details
The details screen shows the time, depth below collar, applied temperature, confidence, operator and notes, and the received waveform.
- Notes — add comments such as weather or site conditions. Notes are saved automatically when you leave the field.
- Export waveform — saves the recording as a .wav file to the phone's
Recordings/aquatarafolder, for analysis on a computer. - Send via email — sends this single reading (see below).
- DELETE READING — removes the reading and its recording.
Sending readings by email
- In a readings list, tap Select readings, then tap the readings you want to send. Tap View readings to leave selection mode.
- Tap Share. For a single reading, use Send via email on its details screen.
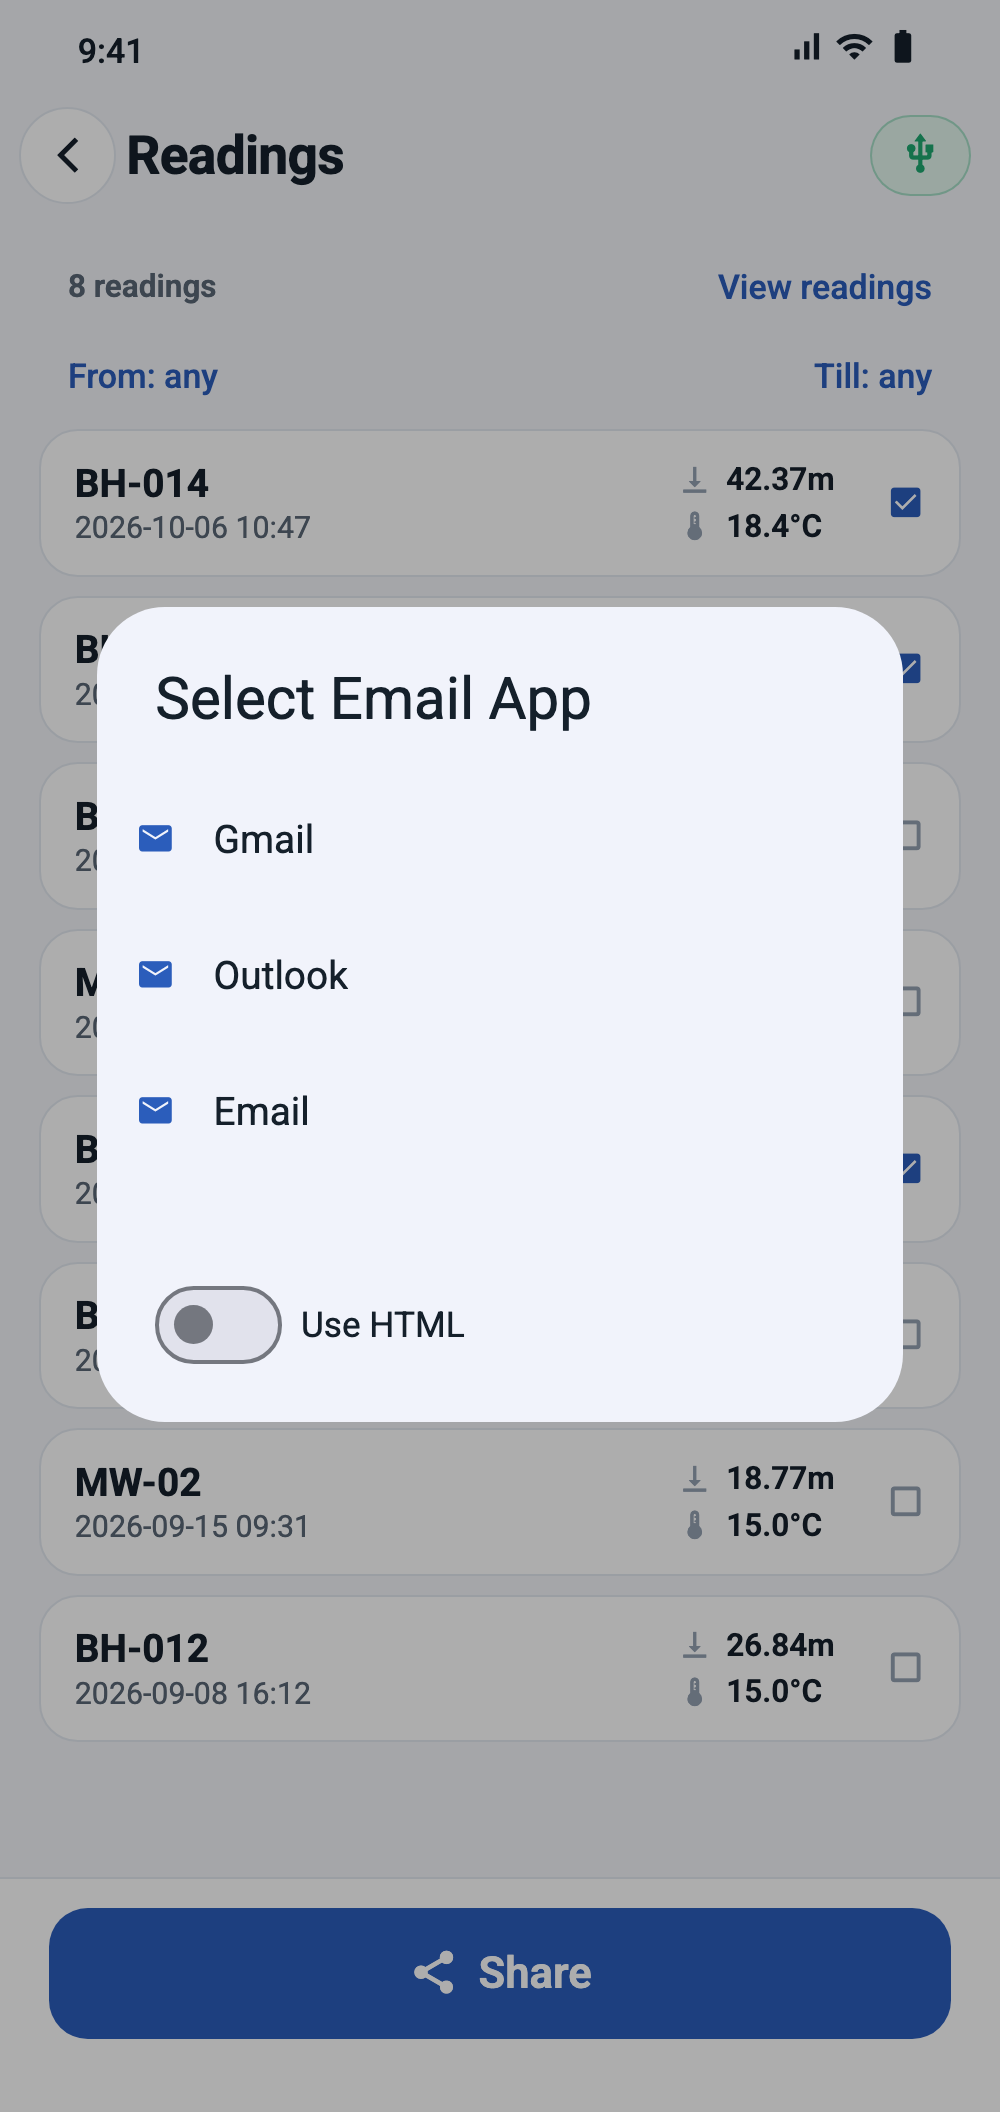
- If a preferred email app is set in the settings, or only one email app is installed, it opens directly. Otherwise choose an app and whether to use HTML formatting.
- Review the prepared email in your email app and send it.
The prepared email contains:
- recipient: the default email from the settings; subject: “Aquatara readings”;
- the readings grouped by borehole and sorted by time, each with recording time, measured depth, temperature assumed, operator and notes;
- a signature with the operator name and organization;
- the recorded waveform of each reading as a .wav attachment.
Section 7
Settings reference
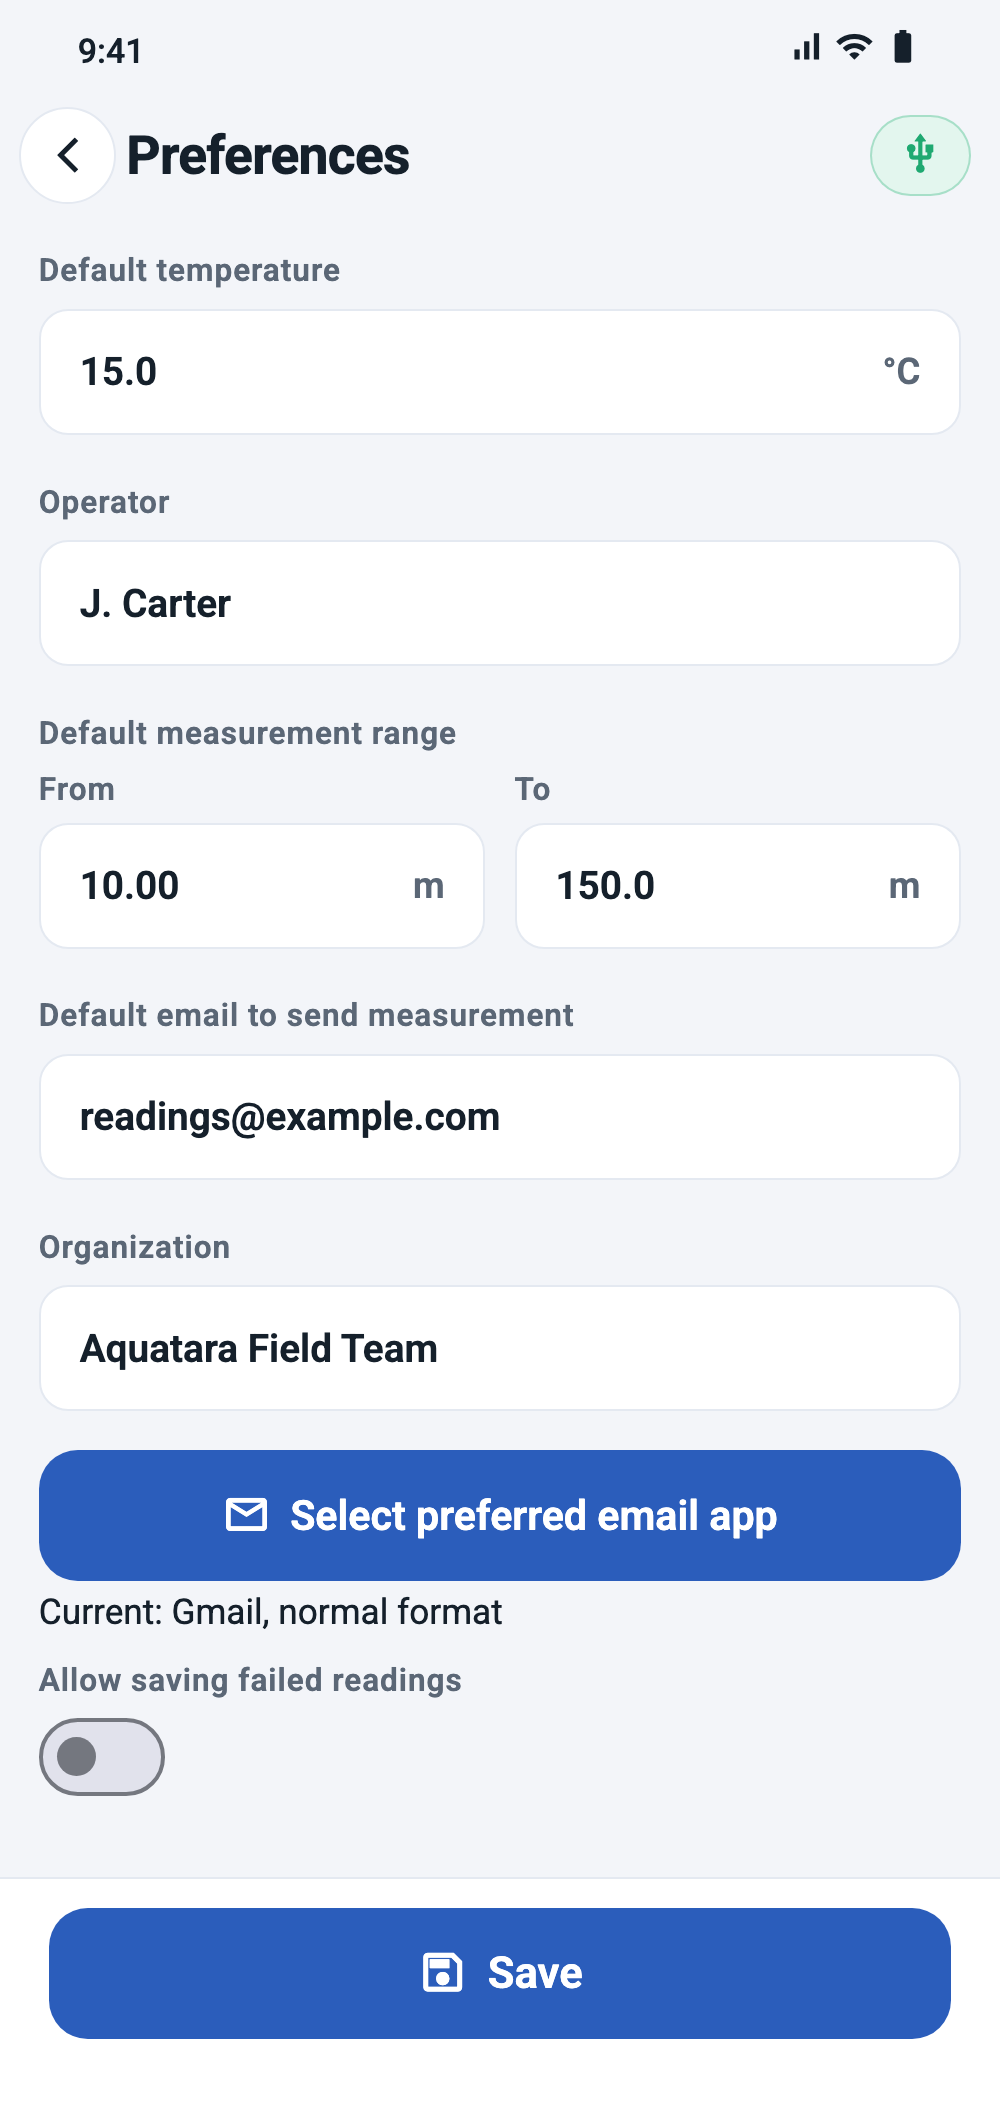
Open Default settings from the home screen. Changes take effect after you tap Save.
| Setting | What it does | Default |
|---|---|---|
| Default temperature | Air temperature used when a borehole is not calibrated or Default is selected. | 15 °C |
| Operator | Your name; stored with every saved reading and used to sign emails. | — |
| Default measurement range | Pre-filled From / To values on the measurement screen. | 10 – 150 m |
| Default email to send measurement | Recipient of shared readings. | — |
| Organization | Added to the signature of shared readings. | — |
| Select preferred email app | Email app and format (HTML or plain) used for sharing without asking each time. | Ask |
| Allow saving failed readings | Allows saving a measurement even if no echo was identified. | Off |
| Chart abscise axis label | Horizontal axis of waveform charts: time (ms) or distance. | Time |
| Chart quality | How many recorded samples are drawn (1 of 20 … every sample). Affects only the chart, not the calculation; lower values draw faster. | 1 of 10 |
| Units: Distance | m, ft or yd — for all entered and displayed distances. | m |
| Units: Temperature | C, F or K — for all entered and displayed temperatures. | C |
| Location format | Display format of coordinates: decimal degrees, degrees and decimal minutes, or degrees, minutes and seconds. | Decimal degrees |
Section 8
Troubleshooting
Section 9
Appendix
Glossary
- Collar
- The top of the borehole casing. All Aquatara distances are measured from here.
- Below collar
- Measured distance from the collar down to the water surface.
- Dipped distance
- Distance to the water measured by hand with a dip meter or tape.
- Casing
- The pipe lining the borehole, typically steel or PVC.
- Pulse
- The short tone burst emitted by the device to start a measurement.
- Echo
- The part of the pulse reflected back from the water surface.
- Peak
- A local maximum in the recorded signal. The app uses the first two peaks above half of the maximum amplitude.
- Peak magnitude
- Height of a peak relative to the loudest point of the recording (0–1).
- Confidence (rms)
- Magnitude of the first detected peak divided by the RMS level of the whole recording. Higher values mean the peak stands out more clearly.
- Speed of sound
- Calculated from the selected temperature; converts echo time to distance.
- Calibrated temperature
- Air temperature derived from a calibration and saved with the borehole.
- Default temperature
- Air temperature from the settings, used when no calibration is available.
- Measurement range
- From / To distances that limit where the app looks for the echo and how long it records.